DIY: Photo Frame Escort Card Display
We had a bride who wanted a different kind of escort display. They traveled a bunch as a couple and we originally had the idea of making a map for the display, but it just was not working out. So I brainstormed and came up with this idea. It was time consuming, but I think it turned out so perfectly!
Materials needed:
There it is! Easy? Not really. But super cute? Yes!! Happy Friday all, We hope you have a GREAT weekend. I somehow have been wrangled into helping Court get her house ready to go on the market MONDAY!! Wahoo!! Phase 2 is about to begin...
Materials needed:
- Plywood the size of the board you will need. we used a 4x4
- Roll of cork - we used two here
- Fabric to cover the front and back
- Staple gun and staples
- Straight pins
- Jewelry wire
- wood pendants (the groom sawed branches for these)
- Marker
- Drill
- Ikea photo frames we used the 4x6 size
- Chalkboard paint
- Painters tape
- Sand paper- any kind will do
- Velcro tabs
- sponge brush
- Pictures!
Okay -so that was a lot of materials!! I am pretty sure I went to the store about a million times for this project!
 |
| Line up the cork on the board to make sure it fits |
 |
| The rolls we got fit perfectly and I went to Michael's 2 weeks in a row with my 50% off coupon so I could save my bride some money - I am so nice! |
 |
| Staple the cork down, make sure it is nice and tight! |
 |
| Action shot of Court doing a great job stapling. I am afraid of the staple gun - she always does the job that requires it. |
 |
| More stapling |
 |
| Lay out your fabric and iron. We used felt, it was perfect! |
 |
| Oh yes - change a diaper in the middle :) |
 |
| More Ironing |
 |
| Cheese for the camera!! Staple the fabric to the back side of the board making sure you pull it nice and taught |
 |
| Make sure to staple it well, people will not see this part, so staple away! |
 |
| Fold the leftover fabric onto the back and tuck the edges to make a clean edge and staple. People will see this if you don't have it against a wall, so try to use minimal staples |
 |
| All done! |
 |
| Next step is the frames! Tape a box in the bottom part of the frame. Real important note here: Make sure you know the orientation of your photos so you know where to put the chalk box |
 |
| Sand the box and wipe clean. If you don't sand it the paint will not stick - I tried it :) |
 |
| Paint! It takes two coats |
 |
| Let them set for about 5 minutes |
 |
| Peel off the tape. Another important note: do not let them dry because the tape will not come off cleanly |
 |
| Write the table name in the box. They had pictures from all the places they had visited and the tables were city names |
 |
| Example |
 |
| A chalk pen works best! |
 |
| The wood pendants - drill a hole in the top (I used a 1/4 bit) and thread the wire through to make a wine charm. The ends of the wire should form to hooks they can easily hook on and off the glass. You can't see it here but the wires are different colors to represent the different meals the guest ordered |
 |
| Up close |
 |
| Hang the frames using the velcro squares. I stapled ( and I really did - Court was not here for this part!) one side of the velcro in the place I wanted the frames and then just stuck the other side on the frame. I made an outline for how it was to go for the day of. Write the person's name on one side of the pendant. |
 |
| Their table on the other! Hang with a straight pin |
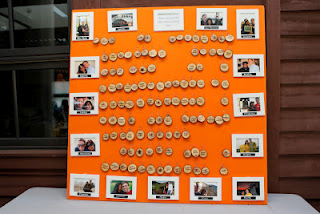 |
| The finished product! Some guests had gotten ahold of it before we got the picture! |